asciify documentation#
Inspired by ascii-view.
Documentation#
Full documentation is available at: asciify-them.readthedocs.io
Features#
CLI: This software can be accessed both as a Python library and as a CLI;
Colored output: ANSI color codes allow to print colors (requires a modern terminal);
Resizing flexibility: Images are scaled to keep aspect ratio and fit the image to the terminal, but both options can be disabled;
Edge detection: Sobel and Canny algorithm are used to highlight edges;
Output flexibility: Resulting images can be saved in a file (both using the terminal to determine optimal size or providing custom height and/or width);
Custom charsets and presets: You can now use different presets or provide a custom charset (any length is supported).
Installation#
The package can be installed through PyPi:
# using pip/pipx
pip install asciify-them
pipx install asciify-them # pipx upgrade to update it

# or using uv
uv tool install asciify-them
Or from source:
git clone https://github.com/ndrscalia/asciify-them
cd <repo-dir>
python -m venv .venv
source .venv/bin/activate
pip install -e .
The software can also be used without installing it through uv:
uvx --from asciify-them asciify path/to/image [OPTIONS]
The package is also available on AUR and kindly kept up to date by @HeadedBranch.
Usage#
This package requires a terminal emulator with true color support (e.g. kitty, alacritty, iTerm2).
CLI#
The only required argument is the path to the image:
asciify <path/to/image> [OPTIONS]
The following options are available:
-bw, --black_white: Set the output to black&white.-e, --edges: Enable edge detection.-w, --width: Provide custom width. If not specified, terminal’s size is going to determine this value. This value can be specified only whenf_type='wide'. It can be used whenever if--format png.-he, --height: Provide custom height. If not specified, terminal’s size is going to determine this value. This value can be specified only whenf_type='tall'. It can be used whenever if--format png.-ar, --no_aspect_ratio: Disable original aspect ratio’s protection.-f, --factor_type: Choose the downsampling factor type among the following values:in_terminal,wide,tall.-F, --format: Choose the format. Default totext, butpngavailable to simply obtain a downsampled.pngimage with a pixel art look[1]. When using--format png, you can still provide only height or only width (the other is calculated to preserve aspect ratio). You can also provide both.--factor_typeis overridden.-b, --blur: Provide a list with kernel size as a tuple, std for x axis, std for y axis. For more details refer to the docs forcv2.GaussianBlur. Changing the default values allow to tweak edge detection.ct, --canny_threshold: Provide edges detection threshold as a tuple. For more details refer to the docs forcv2.Canny.-at, --angles_threshold: Provide kernel size for angles calculation as an integer.-o, --output: Provide the output’s path. If not specified, uses stdout (e.g.: terminal). This option is required if using-F, --format png.-A, --aspect_ratio_correction: Provide the value by witch to divide the terminal’s detected aspect ratio to account for line spacing.-p, --preset: Choose one of the installed preset:classic,extended,unicode_blocks,braille.-c, --charset: Provide a custom charset of any length (use quotes to include space as a character).
Details#
The different factors available are meant for different scenarios:
in_terminalallows to keep the output inside the terminal keeping aspect ratio;wideis better suited for images which are wider than taller but the output does not stay in the terminal. This option is also optimal for conversion to.pngthrough ansee, regardless of the relation between height and width;tallis better suited for images which are taller than wider but the output does not stay in the terminal; If aspect ratio’s protection is disabled, output will be squished by a factor to stay in the terminal.
Python library#
This package can also be used as a python library. Most of the API is exposed to the user, but a convenient wrapper is also available for simpler use cases.
from asciify import asciify

# Minimal use
result = asciify("path/to/image")
print(result)

# More advanced use
result = asciify(
    "path/to/image",
    color_mode="bw",
    edges_detection=True,
    f_type="tall",
    aspect_ratio_correction=1.10,
    charset=["."]
)

with open("output.txt", "w") as f:
    f.write(result)
The .txt output can be used with ansee to get a .png file out of it.
If needed, the core classes can be used as follows:
from asciify import ImgProcessor, Renderer, DEFAULT_CHARSET

# Configs
IMAGE_PATH = "examples/images/girl.jpg"  # Change this to a real image path
ASPECT_RATIO_CORRECTION = 1.10

# Optional parameters (set to None to use terminal size)
height = None
width = None

# Processing options
# default values
keep_aspect_ratio = True
f_type = "in_terminal"  # Options: "in_terminal", "wide", "tall"
angles_thresh = 3
blur = [(9, 9), 1.5, 1.5]
canny_thresh = (200, 300)
color_mode = "color"  # Options: "color", "bw"
edges_detection = False

# Process the image
processor = ImgProcessor(IMAGE_PATH)

if not height and not width:
    term_height, term_width = processor.calculate_print_size()
else:
    term_height = height if height else 40
    term_width = width if width else 100

ds_f = processor.calculate_downsample_factor(
    term_height=term_height,
    term_width=term_width,
    keep_aspect_ratio=keep_aspect_ratio,
    f_type=f_type,
    aspect_ratio_correction=ASPECT_RATIO_CORRECTION
)

ds_img = processor.downsample_image(
    f=ds_f,
    keep_aspect_ratio=keep_aspect_ratio,
    aspect_ratio_correction=ASPECT_RATIO_CORRECTION
)

img_hsv = processor.convert_to_hsv(image=ds_img)

angles = processor.calculate_angles(
    image=ds_img,
    k_size=angles_thresh
)

edges = processor.detect_edges(
    image=ds_img,
    blur=blur,
    canny_thresh=canny_thresh
)

renderer = Renderer(
    color_mode=color_mode,
    charset=DEFAULT_CHARSET # or any custom charset
)                           # or any preset (see changelog
                            # at the bottom of this doc)
if edges_detection:
    result = renderer.draw_in_ascii_with_edges(img_hsv=img_hsv, angles=angles, edges=edges)
else:
    result = renderer.draw_in_ascii(img_hsv=img_hsv)

print(result)
Examples#
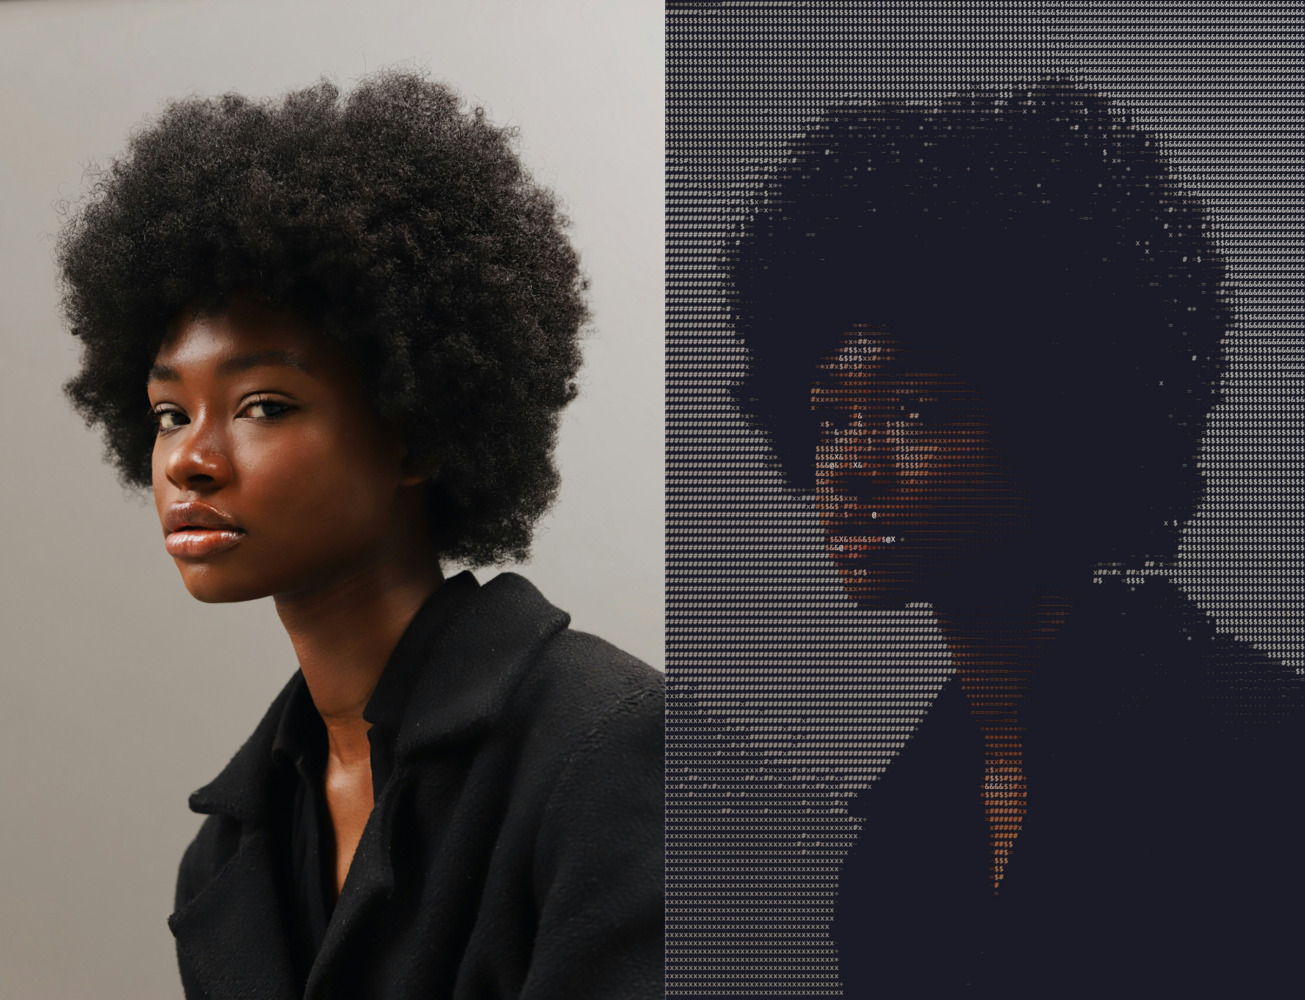
The following image compares the original input with the output you can get with the default options (except for -f, which was set to tall).
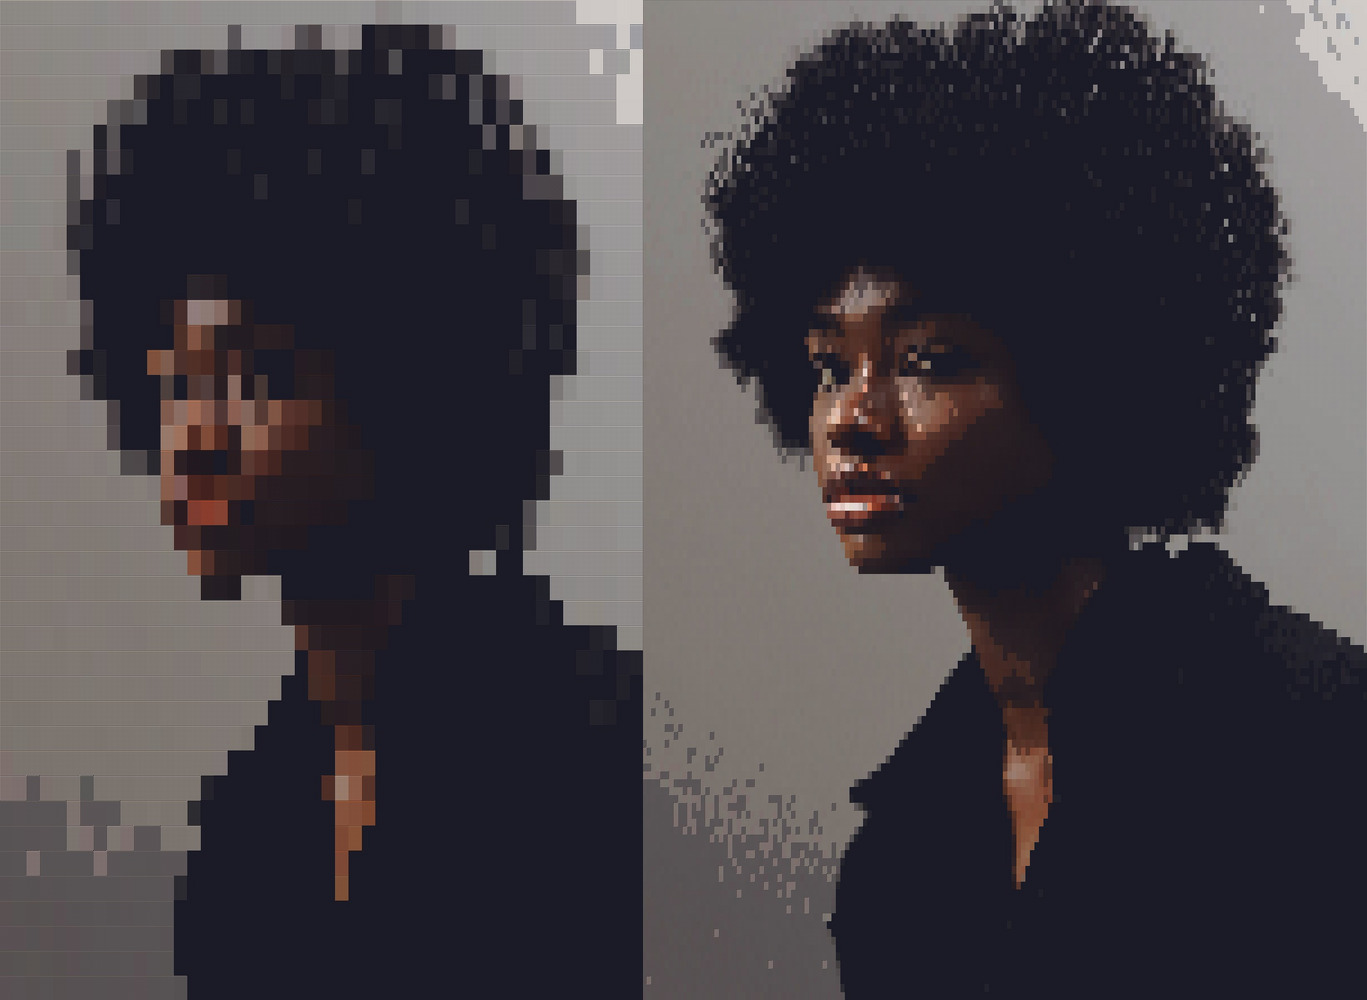
This is what you can get using, for example, the Unicode blocks preset:
# left image
asciify examples/images/girl.jpg --preset unicode_blocks

# right image (you will have to zoom out the terminal)
asciify examples/images/girl.jpg -f tall -p unicode_blocks
Testing#
To test the codebase check tests/README.md.
Changelog#
1.1.1
New
--format pngoption to get a downsampled image with a pixel art look.
1.1.0
Custom charsets of any length can now be provided both in the cli and in the python library.
New presets have been added:
CLASSIC_GRADIENT,EXTENDED_SMOOTH_GRADIENT,BRAILLE_CHARSET,UNICODE_BLOCKS.
1.0.4
Fix to get char’s aspect ratio in the terminal in non-Unix systems.
1.0.3
Add aspect ratio correction flag to account for line spacing.
1.0.2
Windows fix to get terminal size even when stdout is not the terminal.
1.0.1
Improved width factor for better aspect-ratio’s protection.
1.0.0
First working version.
Future updates and possible contributions#
~Allow custom charset with different number of characters~;
Allow tuning brightness for better piping to ansee;
Improve edges’ detection.
Version: 1.1.1
API Reference#
Wrapper Function#
- asciify.asciify(image_path: str, color_mode: str = 'color', edges_detection: bool = False, width: int | None = None, height: int | None = None, keep_aspect_ratio: bool = True, f_type: str = 'in_terminal', blur: list[tuple[int, int], float, float] = [(9, 9), 1.5, 1.5], canny_thresh: tuple[int, int] = (200, 300), angles_thresh: int = 3, aspect_ratio_correction: float = 1.1, charset: list[str] = ' .-=+*x#$&X@', output_format: str = 'text') str | ndarray#
Draw the input image in ASCII art. This function wraps the objects defined in
process.pyandrenderer.pyand orchestrate their workflow.Refer to the docs for
ImgProcessorandRendererfor further details.- Parameters:
output_format (str) – Output format, either “text” (returns ANSI-colored string) or “png” (returns RGB numpy array).
- Returns:
Either a string (text mode) or a numpy array of shape (height, width, 3) (PNG mode).
- Return type:
Union[str, np.ndarray]
Classes#
- class asciify.ImgProcessor(path_to_image: str)#
Bases:
objectPrepare the image for drawing with
Renderer.- calculate_angles(image, k_size=3)#
Calculate angles using Sobel algorithm.
- Parameters:
image (np.ndarray) – The downsampled image.
- Returns:
The angle for every pixel.
- Return type:
np.ndarray
- calculate_downsample_factor(term_height: int, term_width: int, keep_aspect_ratio=True, f_type='in_terminal', aspect_ratio_correction: float = 1.1)#
Calculate downsample factor according to different needs. Refer to the README.md for the different
f_typevalues.- Parameters:
term_height (int) – Terminal’s height in lines.
term_width (int) – Terminal’s width in columns.
keep_aspect_ratio (bool) – Choose wether or not to preserve the original aspect ratio.
f_type (str) – Provide the different kinds of downsampling factors available.
aspect_ratio_correction (float) – Factor by which horizontal stretch can be limited to better estimate font aspect ratio in terminal.
- Returns:
Single factor if
keep_aspect_ratio=True, tuple of two factors ifkeep_aspect_ratio=False- Return type:
int or tuple[int, int]
- Raises:
ValueError – if
f_typeis not chosen amongin_terminal,tall, andwide.
- calculate_print_size()#
If no custom height/width is provided, the print size is derived from the terminal’s size.
- Returns:
Terminal’s height in lines and terminal’s width in columns.
- Return type:
tuple[int, int]
- convert_to_hsv(image)#
Convert the downsampled image to HSV.
- Parameters:
image (np.ndarray) – The downsampled image obtained with
downsample_image().- Returns:
The downsampled image converted to the HSV index.
- Return type:
np.ndarray
- detect_edges(image, blur=[(9, 9), 1.5, 1.5], canny_thresh=(200, 300))#
Detect edges with Canny edges detection algorithm after blurring the image for improved detection.
- Parameters:
blur (list[tuple[int, int], float, float]) – Determine the blur’s intensity. For more details refer to the docs for
cv2.GaussianBlur().canny_thresh (tuple[int, int]) – Determine the threshold for edges detection. For more details see
cv2.Canny().
- Returns:
- Return type:
- downsample_image(f: int, aspect_ratio_correction: float = 1.1, keep_aspect_ratio=True)#
Downsample the input image.
- Parameters:
f (int or tuple[int, int]) – The downsampling factor obtained with
calculate_downsample_factor().aspect_ratio_correction (float) – Factor by which horizontal stretch can be limited to better estimate font aspect ratio in terminal.
keep_aspect_ratio – Choose wether to preserve or not original aspect ratio. It must be set to the same value as it was in
calculate_downsample_factor().
- Returns:
The downsampled image.
- Return type:
np.ndarray
- class asciify.Renderer(color_mode='color', charset=None)#
Bases:
objectDraw ASCII art from the results obtained with
ImgProcessor.- draw_char_bw(pixel: ndarray, line: list)#
Draw ASCII image chosing the right char based on the pixel’s value (HSV) and coloring every char in white.
- Parameters:
pixel (np.ndarray) – HSV pixel.
line (list) – A list containing the string for the pixels of every line.
- draw_char_col(pixel: ndarray, line: list)#
Draw ASCII image chosing the right char based on the pixel’s value (HSV), while coloring it with ansi escape codes based on the equivalent RGB.
- Parameters:
pixel (np.ndarray) – HSV pixel.
line (list) – A list containing the string for the pixels of every line.
- draw_in_ascii(img_hsv: ndarray)#
Draw the image with the corresponding drawing function.
- Parameters:
img_hsv (np.ndarray) – The downsampled image in HSV format.
angles – The angles extracted from the downsampled image.
- Returns:
Strings composing the ASCII image, with returns for every line.
- Return type:
str
- draw_in_ascii_with_edges(img_hsv: ndarray, angles: ndarray, edges: ndarray)#
Draw edges according to angles and draw them with the corresponding drawing function.
- Parameters:
img_hsv (np.ndarray) – The downsampled image in HSV format.
angles – The angles extracted from the downsampled image.
edges (np.ndarray) – The edges extracted from the downsampled image.
- Returns:
Strings composing the ASCII image, with returns for every line.
- Return type:
str
- draw_in_pixels(img_hsv: ndarray) ndarray#
Convert HSV image to RGB pixel array for PNG export.
Each character position in the charset corresponds to a brightness level, but we preserve the original pixel color regardless of charset selection. The charset is used only for brightness mapping in text output.
- Parameters:
img_hsv (np.ndarray) – The downsampled image in HSV format.
- Returns:
RGB pixel array with shape (height, width, 3).
- Return type:
np.ndarray
- hsv_to_rgb(h: int, s: int, v: int)#
Convert HSV (OpenCV: h: 0-360, s: 0-100, v: 0-100) to RGB.
- Parameters:
h (int) – Hue value from pixel.
s (int) – Saturation value from pixel.
v (int) – Value from pixel.
- Returns:
A tuple containing the equivalent RGB value.
- Return type:
tuple[int, int, int]